
Finding the right bra size is crucial for comfort and support. However, many women wear the wrong size, leading to discomfort and an unflattering fit. How to measure bra size at home is simple and can be done with just a few tools. This article provides a detailed, step-by-step guide to help you how to measure bra size accurately.
Why Accurate Measurements Matter
Wearing the correct bra size can enhance your overall appearance and boost your confidence. A well-fitted bra supports your bust properly, helps maintain posture, and prevents discomfort, such as chafing or shoulder pain. Misjudging your size can lead to a range of issues, including back pain, poor breast support, and an unattractive silhouette under clothing. Therefore, knowing how to measure bra size is essential.
If you want some information about Solar Light and want to buy them, then check out our previous post.
Tools You Will Need
Before you begin measuring, gather the following tools:
- Soft measuring tape: A flexible tape measure is ideal for body measurements.
- Pen and paper: To write down your measurements.
- A mirror: Helps ensure accuracy while measuring.
- A non-padded bra: Wearing a comfortable, non-padded bra allows for more precise measurements.
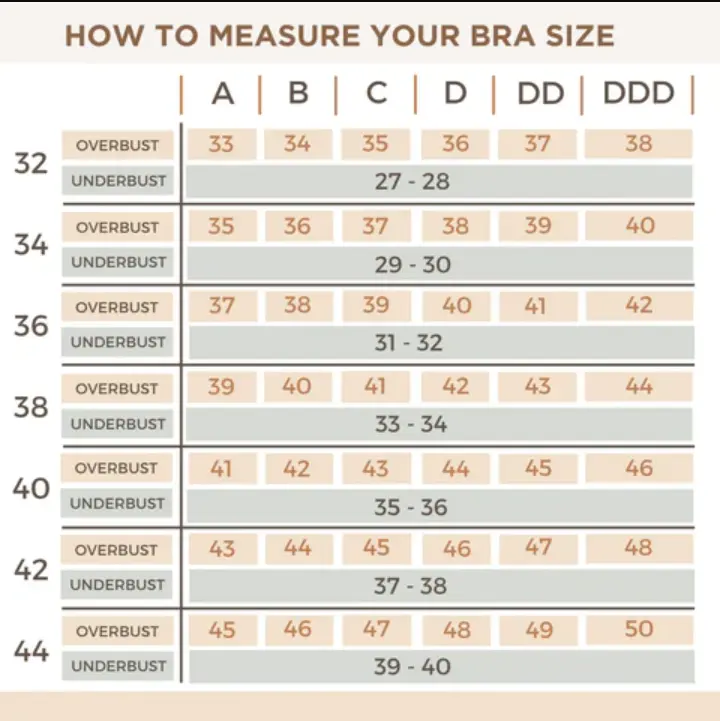
Step 1: Measure Your Band Size
1.1 Prepare for Measurement
- Wear a non-padded bra: This helps ensure that the measurements are not influenced by additional padding.
- Stand up straight: Good posture is important for accurate measurements.
1.2 Find Your Underbust Measurement
- Locate your underbust: This is the area directly under your breasts, where the band of the bra will sit.
- Wrap the measuring tape around your ribcage: Position it snugly but not too tightly, ensuring it’s parallel to the ground.
- Take the measurement: Exhale gently, and note the measurement in inches. If you get a decimal (e.g., 32.5), round it up to the nearest whole number.
1.3 Calculate Your Band Size
- Add 4 or 5 inches:
- If your underbust measurement is even, add 4 inches.
- If your underbust measurement is odd, add 5 inches.
- If your underbust measurement is 32 inches (even), your band size would be 36 (32 + 4).
- If it’s 31 inches (odd), your band size would be 36 (31 + 5).
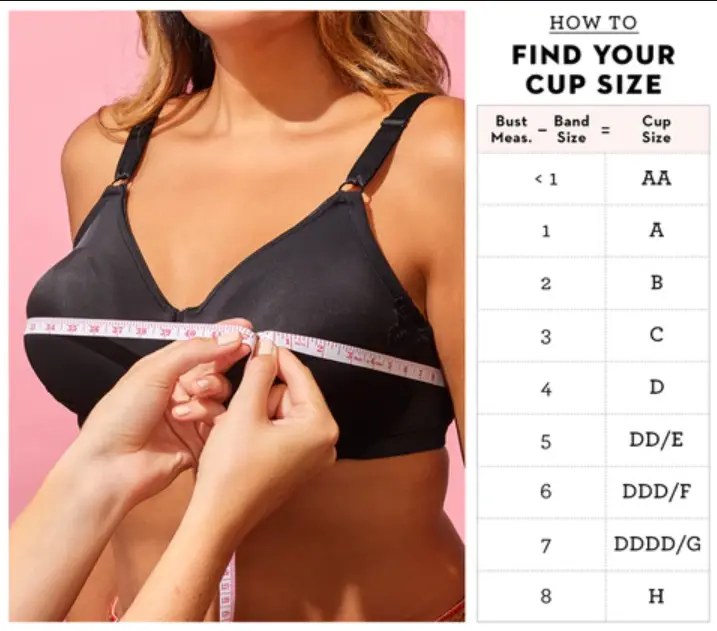
Step 2: Measure Your Bust Size
2.1 Find Your Bust Measurement
- Locate the fullest part of your bust: This is typically at the nipple level.
- Wrap the measuring tape around your bust: Ensure the tape is straight and not too tight, keeping it level and parallel to the ground.
- Take the measurement: Make sure it fits comfortably without digging into your skin.
If you want some information about Solar Light and want to buy them, then check out our previous post.
Step 3: Calculate Your Cup Size
3.1 Find the Difference
- Subtract your band size from your bust size:
- This difference will help you determine your cup size.
- If your bust measurement is 40 inches and your band size is 36 inches, the difference is 4 inches (40 – 36 = 4).
3.2 Determine Your Cup Size
Using the difference, refer to the following scale to determine your cup size:
- Less than 1 inch: A cup
- 1 inch: B cup
- 2 inches: C cup
- 3 inches: D cup
- 4 inches: DD (or E cup)
- 5 inches: DDD (or F cup)
In our example, a difference of 4 inches indicates a DD cup size. Therefore, your complete size would be 36DD.
Step 4: Try It On
4.1 Choosing the Right Bra
When shopping for bras, remember that different styles and brands may fit differently, even if they are the same size. Here are some tips to consider:
- Style matters: Consider different styles like underwire, wireless, sports bras, or push-up bras. Each style may fit differently.
- Check the fit: Once you find a bra that fits your size, make sure to adjust the straps for comfort and support.
4.2 Check for Proper Fit
- Band fit: The band should fit snugly around your ribcage without riding up. You should be able to fit one or two fingers underneath it.
- Cup fit: Ensure your breasts are fully contained in the cups without spilling over. The center gore (the part between the cups) should lie flat against your chest.
- Strap comfort: The straps should not dig into your shoulders. They should provide support without excessive pressure.
If you want some information about Solar Light and want to buy them, then check out our previous post.
Step 5: Adjustments and Re-measuring
5.1 Reassess Periodically
Your body changes over time due to weight fluctuations, hormonal changes, or pregnancy. It’s essential to re-measure every six months or whenever you notice discomfort.
5.2 Bra Lifespan
Bras typically last about 6 to 12 months, depending on how often they are worn. It’s a good idea to replace them periodically to ensure optimal support.
Common Bra Size Myths
Myth 1: Your Bra Size Never Changes
Many women believe that once they find their bra size, it remains the same forever. In reality, body changes—such as weight loss, weight gain, pregnancy, or aging—can affect your size.
Myth 2: A Larger Cup Size Means a Larger Band Size
Cup sizes are not absolute measurements; they depend on the band size. For example, a 36C and a 34D have the same cup volume, but the band size differs.
Myth 3: You Should Always Wear the Same Size Across Brands
Bra sizing can vary significantly between brands and styles. It’s essential to try on bras and find the best fit for each specific style.

Tips for Finding the Perfect Fit
- Try Different Brands: Since sizing can vary, explore various brands to find the one that suits you best.
- Check for Comfort: Ensure that the bra feels comfortable all day long. It should not pinch, dig, or cause discomfort.
- Wear It for a While: Try the bra on for a few minutes to see how it feels. Move around, raise your arms, and check if it stays in place.
- Look for Quality: Invest in bras made from quality materials that will provide better support and last longer.
- Ask for Help: Don’t hesitate to ask for assistance from sales staff when trying on bras; they can offer valuable advice on fit and style.
Conclusion
How to measure bra size at home is straightforward and can make a significant difference in your comfort and confidence. With just a measuring tape and a few easy steps, you can find your correct size and enjoy the benefits of a well-fitted bra.
Remember that body shapes and sizes can change, so it’s important to reassess your measurements regularly. A correctly fitted bra not only enhances your appearance but also provides the support and comfort you need throughout your day. Don’t hesitate to seek professional fitting advice if you’re still unsure; the right fit is worth the effort!
If you want some information about Solar Light and want to buy them, then check out our previous post.

