How to unsend an email in outlook? Sending an email can sometimes lead to instant regret—perhaps you’ve hit “send” too quickly, included an attachment you forgot to add, or accidentally addressed it to the wrong recipient. Luckily, Microsoft Outlook provides a feature to “unsend” or recall an email, giving you a second chance to rectify your mistake. This guide will walk you through the process step-by-step, ensuring you understand how to effectively use this feature.
If you want some more information about Sunday Dinner Ideas then checkout our last blog post.

Understanding the Recall Feature
Before diving into the steps, it’s important to understand the limitations of the recall feature in Outlook:
- Email Must Be in the Same Organization: The recall function works only for emails sent within the same organization that uses Microsoft Exchange. If you send an email to someone outside your organization, recall will not work.
- Recipient Must Not Have Read the Email: The recall will only succeed if the recipient has not yet opened the email. If the email has already been read, you will not be able to recall it.
- Email Settings: The success of recalling an email can also depend on the recipient’s email settings. For example, if the recipient is using Outlook but has disabled the recall feature, the email cannot be recalled.
- Notifications: If you attempt to recall an email, both you and the recipient may receive notifications about the recall attempt, which could draw attention to your initial mistake.
Step-by-Step Guide to Unsend an Email in Outlook
Step 1: Open Microsoft Outlook
Begin by launching the Microsoft Outlook application on your computer. Make sure you are logged into the account from which you sent the email you wish to recall.
If you want some more information about Sunday Dinner Ideas then checkout our last blog post.
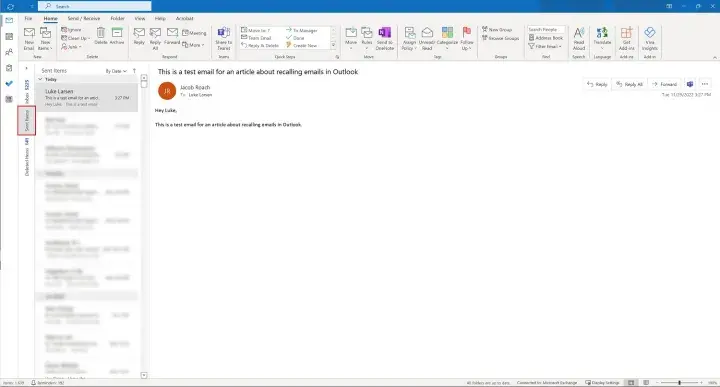
Step 2: Go to the Sent Items Folder
- In the left-hand navigation pane, locate and click on the “Sent Items” folder. This folder contains all the emails you’ve sent.
Step 3: Find the Email to Recall
- Browse through your sent emails to find the specific email you want to recall. You can also use the search bar at the top to speed up the process by typing in the recipient’s name or subject of the email.
Step 4: Open the Email
- Double-click on the email you want to recall to open it in a new window.
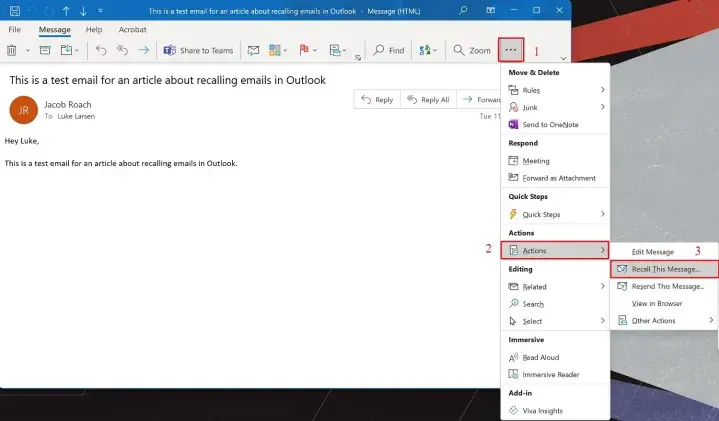
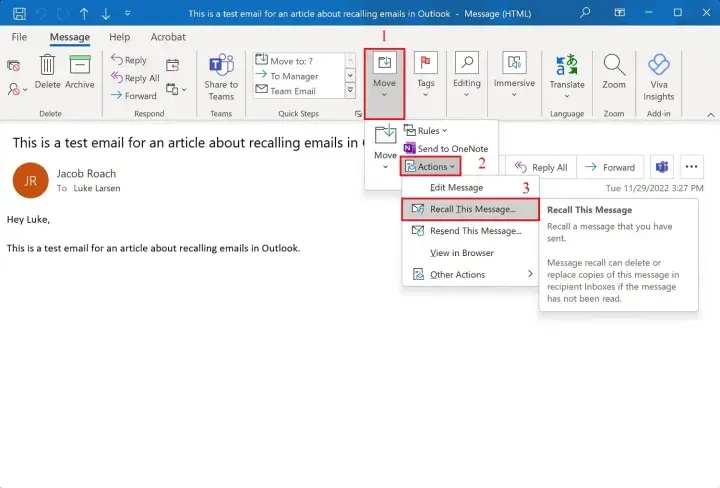
Step 5: Initiate the Recall Process
- In the open email window, navigate to the “Message” tab at the top of the window.
- Look for the “Actions” group. Click on “More Actions,” then select “Recall This Message.”
Step 6: Choose Your Recall Options
If you want some more information about Sunday Dinner Ideas then checkout our last blog post.
A dialog box will appear with two options:

- Delete unread copies of this message: This option will remove the email from the recipient’s inbox if it has not been opened.
- Delete unread copies and replace with a new message: Choose this option if you want to replace the original email with a new one. If you select this, you’ll need to compose your new email in the same window.
Step 7: Confirm Your Choice
- After selecting your desired option, click “OK” to proceed. If you chose to replace the email, you can make the necessary edits before sending the new message.
Step 8: Check for Recall Success
Once you initiate the recall, you will receive a notification in your inbox regarding the success or failure of the recall attempt. Keep an eye out for these notifications:
- If successful, you’ll see a message indicating that the recall was successful, and the email has been deleted from the recipient’s inbox.
- If unsuccessful, the notification will inform you that the recipient has already read the email or that the recall was not possible due to other reasons.
Step 9: Follow Up If Necessary
If you want some more information about Sunday Dinner Ideas then checkout our last blog post.
If the recall fails, consider sending a follow-up email to the recipient explaining the mistake. This is especially important if the content of the original email was sensitive or incorrect.
Tips for Successful Email Management
To minimize the need for recalling emails in the future, consider implementing these best practices:
1. Use the Delay Delivery Feature
Outlook has a feature that allows you to delay the sending of emails. This gives you a buffer period to catch any mistakes before the email is sent.
- How to Set It Up:
- Compose your email.
- Go to the “Options” tab.
- Click on “Delay Delivery.”
- Under “Delivery options,” check the box for “Do not deliver before,” and set a date and time.
2. Always Double-Check Recipients
Before hitting “send,” double-check the recipient list to ensure you’ve selected the correct individuals. A quick review can save you from significant errors.
3. Review Email Content Carefully
Take a moment to read through your email before sending it. Look for spelling mistakes, incorrect information, or inappropriate tone.
4. Use the “Send Later” Feature
If you often find yourself sending emails too quickly, consider using the “Send Later” feature. This allows you to schedule your email to be sent at a later time.
5. Utilize the “Drafts” Folder
If you want some more information about Sunday Dinner Ideas then checkout our last blog post.
If you are unsure about the content of an email, save it as a draft. This way, you can revisit it later with a fresh perspective before sending.
Common Scenarios Where Recall is Useful
- Mistaken Recipients: If you accidentally send a sensitive email to the wrong person, recalling it can help prevent information leaks.
- Typos or Errors: For emails with typos or incorrect information, recalling allows you to send a corrected version.
- Attachments: If you forgot to attach a file or attached the wrong file, the recall feature can be handy.
Limitations and Considerations
While the recall feature can be beneficial, it’s essential to be aware of its limitations:
- Time Sensitivity: If the recipient is busy and checks their email frequently, they may read your email before you have a chance to recall it.
- Outlook Versions: The recall feature is only available in certain versions of Outlook (usually enterprise versions). Ensure your version supports this feature.
- Cross-Platform Issues: If the recipient uses a different email client, the recall may not work as intended.

Conclusion
Recalling an email in Outlook can be a lifesaver in situations where you need to make a quick correction. By following the steps outlined in this guide, you can effectively unsend an email, provided the circumstances allow it. However, to avoid the need for this feature, consider adopting proactive email practices. With these tools and strategies, you can enhance your email communication skills and minimize the risk of errors in the future.
If you want some more information about Sunday Dinner Ideas then checkout our last blog post.


